Personally fitted. Individually styled.
Fill it out or print it, then email it to us.
San Francisco, CA 94102
Beautiful hair.
Made for you.
Custom hairpieces and wigs, fitted and styled in our San Francisco studio. Choose your section to get started.
Illustrative examples — not actual clients.
Custom hairpieces and wigs, personally fitted and styled by Patrick in our private San Francisco studio.
Let us help you fit your next custom hairpiece.
Come in for a personal fitting, or explore your custom options from home.
What are we making for you?
Send us the hairpiece or wig you want copied
Mail your existing hairpiece or full-cap wig to:
New Hair for Men & WomenAttn: Patrick McKay
490 Post Street, Suite 1505
San Francisco, California 94102
Include your name, phone number, email and a note explaining what to copy or change. You may address the package to New Hair for Men & Women or Patrick McKay.
Where do you need coverage?
Choose the area you want your hair system to cover.
Choose the picture closest to your hair loss. Bare scalp shows the area needing replacement; the remaining hair stays your own. These are examples, and your system is made to your measurements.
Choose your frontal hairline shape — A, AA, C or CC
Choose the front hairline you prefer. Compare the shape across the forehead and at both temples. These AI-generated examples show the four contours; they are not client results.
White tape shapes are contour references only. Choosing a hairline does not order tape; your final edge follows your confirmed template or design.
Anything to copy or change? (optional)
Prefer a downloadable order form?
Download our fillable PDF, save your answers, and email it to info@newhairformen.com. You can also print it, complete it by hand, and mail it with your labeled samples or template.
Download order form (PDF)How would you like to get fitted?
Choose a studio fitting or send your fit details from home.
Choose one at-home method
Complete just the method you select.
Come in. We’ll take care of the measurements.
You don’t need to complete this form before your visit. We’ll work through your choices together and help you place your custom order.
490 Post Street, Suite 1505
San Francisco, CA 94102
Want to explore before you visit? The Base, Color and Hair steps are optional for your appointment.
Open the illustrated guide below when you’re ready to make your template.
Make your head template — 6 illustrated steps
What you are making: a clear, curved shell of the area your hairpiece will cover. This guide is for a top-of-head hairpiece.
You’ll need: clear kitchen plastic wrap, clear adhesive tape, a washable cosmetic pencil, permanent marker, scissors and a mirror. A helper makes the sides and back easier.
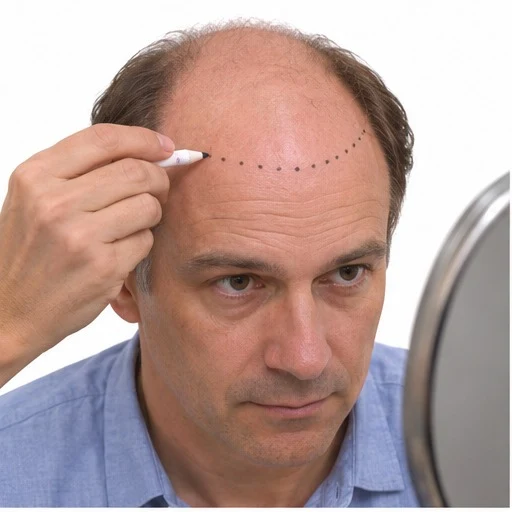
Move your existing hair away from the area to cover. Use a washable cosmetic pencil to mark where you want the front hairline.
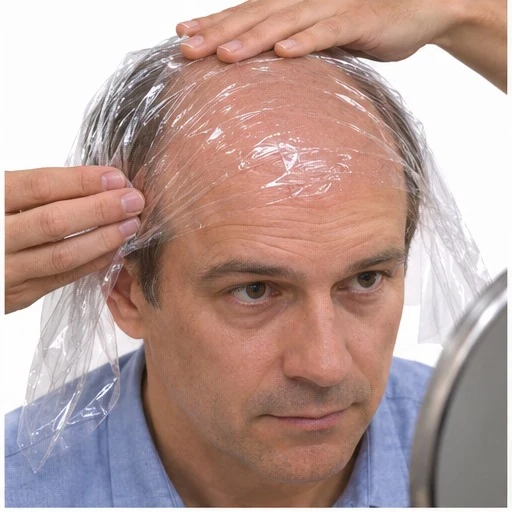
Cover the bald area with clear kitchen plastic wrap. Smooth out wrinkles. Have a helper hold it steady; keep your face uncovered.
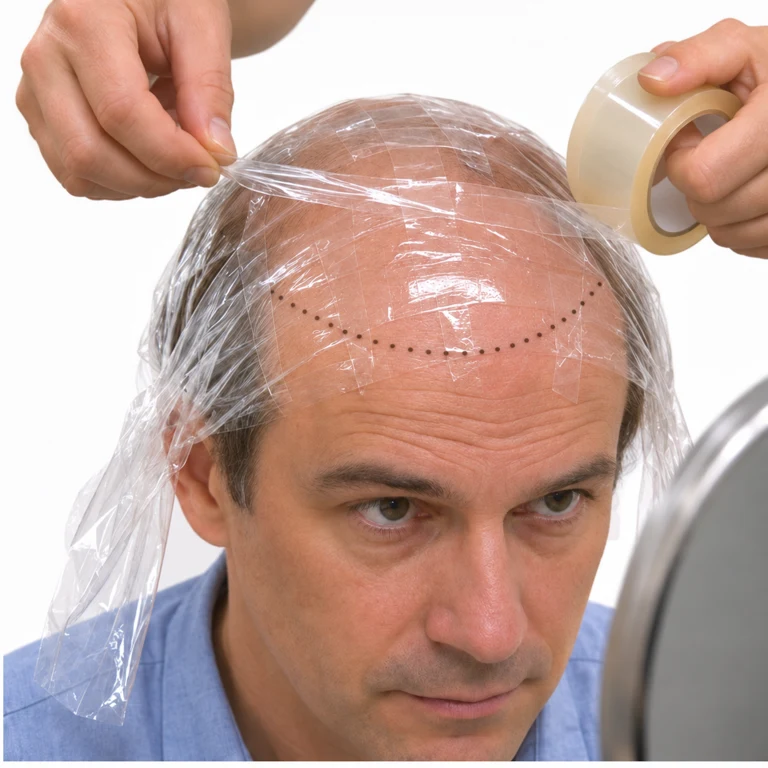
Keep your dotted hairline visible underneath the clear wrap. Place overlapping clear tape strips over the wrap: front to back, side to side, then front to back again. Tape goes on the plastic, not on your hair or skin.
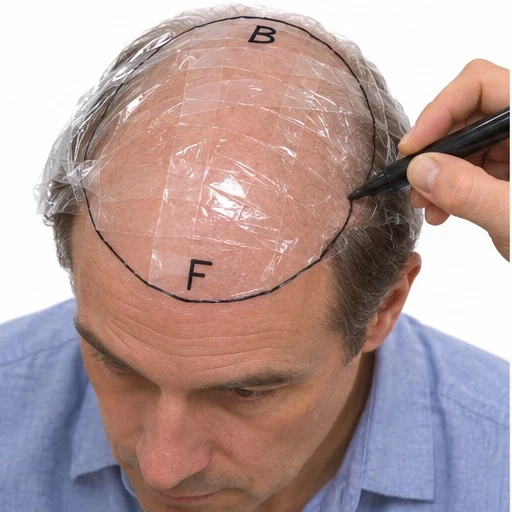
Draw around the area to cover on the taped plastic. Mark FRONT, BACK, LEFT and RIGHT, plus your name and date. Add clear tape over the writing.
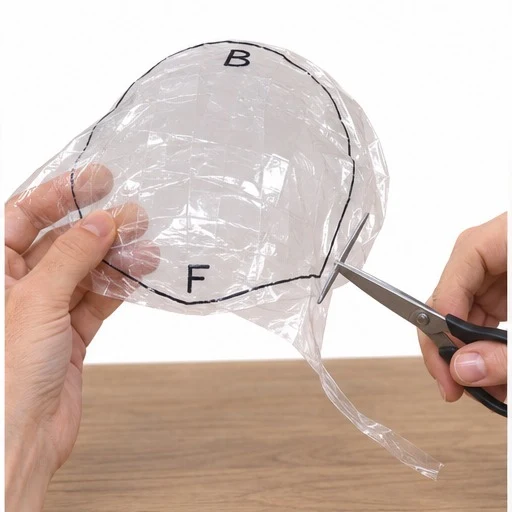
Lift the entire mold off your head. Hold it away from your head and cut around the marked outline. Keep the curved mold; discard the excess plastic.
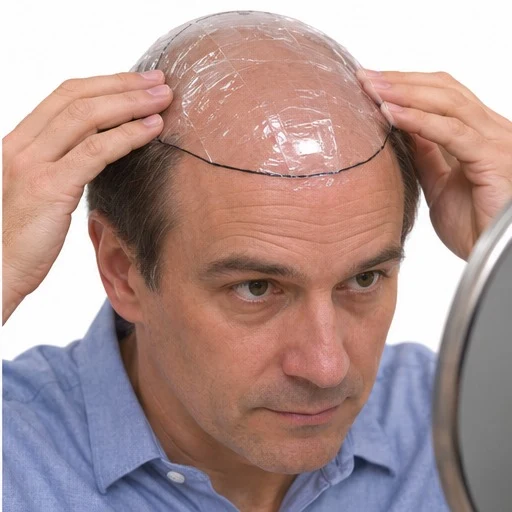
Set the trimmed mold back on your head. Check that it covers the intended area and follows your front hairline, sides and back. It should sit smoothly without gaps.
Once the fit is correct: mail the finished mold in a small box so it keeps its curved shape. Include your contact details and separately labeled hair-color samples.
Mail to: New Hair for Men & Women, 490 Post Street, Suite 1505, San Francisco, CA 94102.
What are you measuring?
Choose the guide for your coverage.
Hairpiece: measure the area to cover
Width — side to side: Across the widest part of the area you want the hairpiece to cover.
Length — front to back: From the planned front hairline to the back edge of that area, along the center of your head.
Let a soft measuring tape follow your scalp. The shaded area is an example; use your own coverage boundary.
Use a soft tape measure. Choose inches or centimeters for all entries.
Need more help measuring width and length?
- Choose the coverage boundary. Identify the front, back, and sides of the area you want covered. Use your natural front hairline, or mark where you want the front edge of the hairpiece to sit.
- Width: measure from one side boundary to the other across the widest part of the coverage area. Let the tape follow the curve of your scalp.
- Length: measure down the center from the planned front hairline to the back boundary, following your scalp.
- Check twice. Record width first, then length, in the selected units. Do not pull the tape tight or use a rigid ruler.
Width and length alone do not describe an irregular outline or the curve of your head. A plastic-wrap template or an existing well-fitting hairpiece gives Patrick a better shape reference. For a full-cap wig, use the seven illustrated measurement questions below.
Measure your full-cap wig at home
Seven measurements. Open a numbered panel to see its picture and enter your size.
Before you measure — read instructions
Both guides use the same seven measurements. Switching illustrations keeps your entries. The yellow measuring tape shows the route against the head. The over-the-top views show the tape crossing the crown. Follow the starting and finishing points written beside each image. Original AI-generated demonstration models.
Use a soft cloth measuring tape and a mirror. Keep any hair flat, the way you will wear it under the wig. A helper can make the back measurements easier.
- Find your starting points. Use your natural hairline. If you no longer have one, mark where you want the wig to begin with a washable skin-safe pencil. Mark the front, the bottom of each sideburn, and the back edge at the nape.
- Keep the tape against your head. It should lie flat, comfortably snug, without pulling tight.
- Follow each pictured route. Measure three times and record the consistent result in your chosen units.
Words used below: The temple is the area just in front of the upper part of your ear. A sideburn is the strip of hair in front of your ear. The nape is the back of your neck, where the wig’s bottom hairline ends.
1. Circumference — around your headEnter size
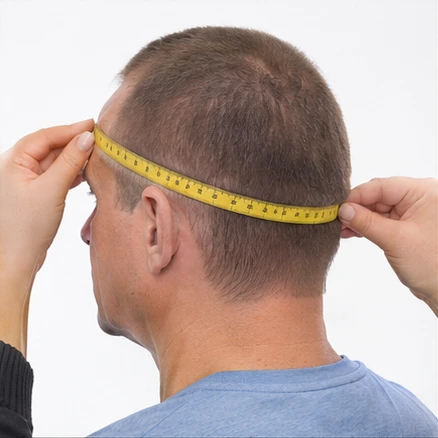
2. Front hairline to napeEnter size
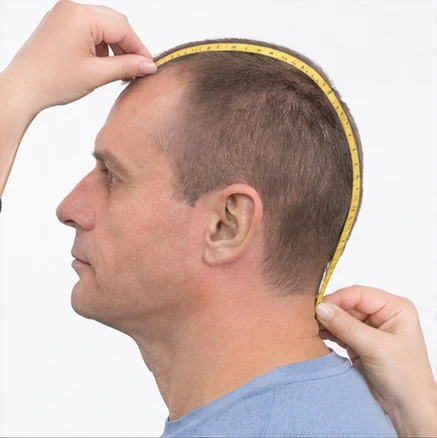
3. Ear to ear — across the foreheadEnter size
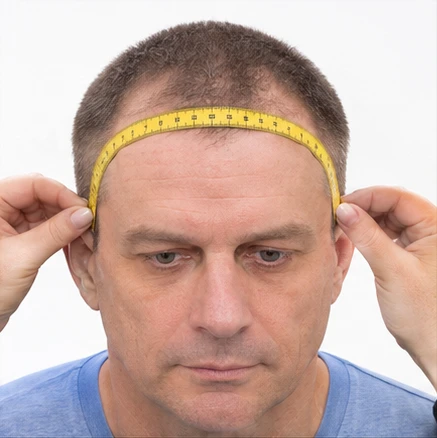
4. Sideburn to sideburn — over the topEnter size
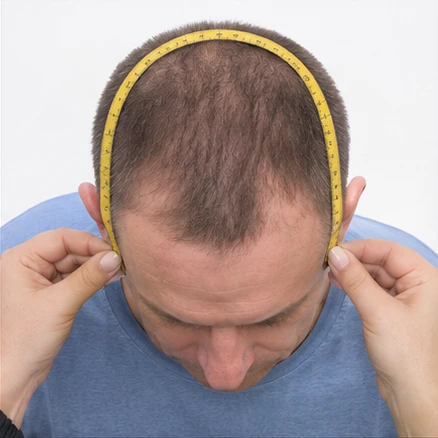
5. Ear to ear — over the topEnter size
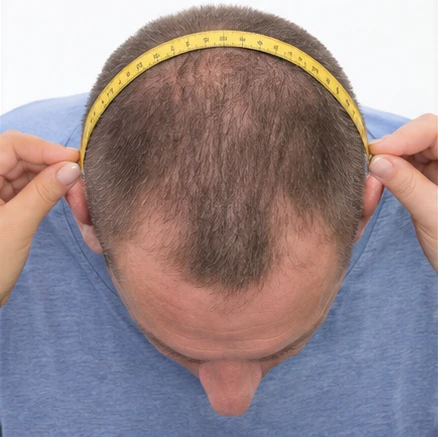
6. Temple to temple — around the backEnter size
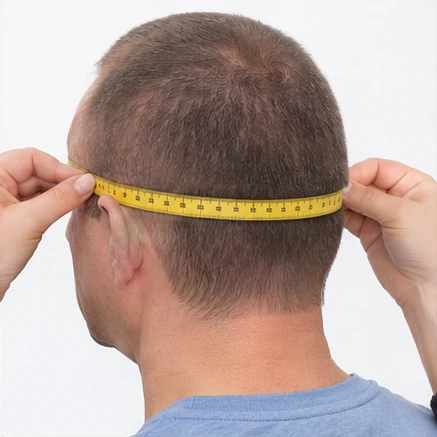
7. Nape width — across the neck hairlineEnter size

All seven measurements are above. Open any panel to check or change your entries.
Send us the hairpiece or wig you want copied
Mail your existing hairpiece or full-cap wig to:
New Hair for Men & WomenAttn: Patrick McKay
490 Post Street, Suite 1505
San Francisco, California 94102
Include your name, phone number, email and a note explaining what to copy or change. You may address the package to New Hair for Men & Women or Patrick McKay.
Base outline Optional · Choose oval, round, match or ask Patrick
What do “base shape” and “front hairline” mean?
Base shape: the outline of the entire hairpiece, as if you were looking down at the top of your head. Oval is longer than it is wide; round has a similar width and length.
Front hairline: the edge of the hairpiece along your forehead. The front corners are the areas above your temples, on either side of your forehead.
Set back at the corners: the front edge sits higher on each side, above your temples. Pointed: a small point comes down in the middle of your forehead.
You do not need to know a supplier’s shape code. Patrick will confirm the shape from your template, existing hairpiece, or consultation.
Anything you’d like Patrick to know? (optional)
Choose your base.
Choose a base, its material color, and its front edge. Customize any design if you wish.
Poly skin: a polyurethane sheet. PU-coated mesh: mesh strengthened with a polyurethane coating. Band widths are in inches; skin thickness is in millimeters.
Choose a picture above
Tap the base you prefer. Its details will appear here.
Customize your base
1. Main base material
What covers most of your head.
2. Sides and back
Choose the material for the attachment band around the edge.
Set different widths by area
3. Front hairline
Choose the material at the front, then how far it extends back from your hairline.
Optional poly band or narrow skin edge at the front
The picture shows the standard design. Change only the widths you want different; your requests are summarized below. Widths are in inches, not material thickness.
The poly band, lace front and narrow thin-skin front edge are separate material areas. Request a new lace front by choosing its material under Front construction below. Patrick will confirm the layout and any price change.
Your base: Not selected yet.
Choose a hairpiece base
Choose a base below. Drawings show the front at the top; photos show each piece from its clearest natural angle.
A custom-design request. Patrick will confirm material availability and dimensions.
All-skin thickness
Choose the thickness of the skin material, measured in millimeters.
Choose your base color
Match the material to your scalp tone. This is the base color, not the hair color.
View base-color samples
Color samples are approximate screen guides; Patrick will confirm the shade and availability for your chosen material.
Finish your front
Choose your front material, the finish of its edge, and whether you want bleached knots.
Front material
Straight or scalloped material edge?
The top of each picture faces your forehead. The rounded scallop tips point forward, away from the base material. Choose how small or broad you want those curves. Your overall A, AA, C or CC hairline shape is chosen on Your Fit.
Illustrations show the edge shapes, not their actual size. To copy a specific scallop, choose “Match my sample” and describe it below.
Bleached or unbleached lace knots
Front widths, scallop pattern or other construction notes
Let’s find your color.
Pick a shade, send a sample, or match an order you already love. Patrick will help confirm the match.
1. Pick the closest hair color
Tap a picture to choose. The name and number appear together on every shade.
Screen colors are approximate. Send a hair sample for a closer match.
2. Would you like any gray?
Start with 0% — No gray, or tap the amount you prefer. More gray means a lighter mix.
Gray pictures use off-black hair (#1B) to show the amount. Your chosen hair shade stays selected.
Looking for a ready-mixed off-black and gray shade?
These blends use off-black (#1B) hair. Choose this only if you want that base shade.
Mail to: New Hair for Men & Women, 490 Post Street, Suite 1505, San Francisco, CA 94102.
We’ll start with your previous order.
Enter an order number or approximate date if you have it. Patrick will confirm the color record with you.
Want to change the gray amount? Add your request in section 5: Color notes.
You don’t have to decide alone.
Bring your questions to a studio fitting, or call or text Patrick. You can leave color choices for the consultation.
Ask Patrick about my colorCall (415) 788-0711What kind of gray hair? Optional
Highlights & darker roots Optional
Highlights add a lighter shade. Root color adds a different shade near the scalp. Leave these unchanged if you want one overall color.
Anything else about your color? Optional
Can I use a photo to match my color?
Photos help explain the look you want, but lighting and screens change color. Use daylight, no filters, and more than one angle. A physical hair sample gives Patrick a better reference for matching.
Let’s create your look.
Start with the basics. Patrick can help with every choice.
1. Choose your hair
Choose the material you’d like. We’ll confirm what suits your base and lifestyle.
Hair type
Choose your blend
Enter either percentage. The other updates automatically so the total is always 100%.
Not sure? Leave these blank and Patrick will help you choose.
Your requested blend is subject to confirmation of availability and price. Gray percentage is selected separately in the Color step.
2. How full would you like it?
Density means how much hair there is. Choose your overall fullness first.
Different fullness in specific areasCustomize
Leave a box blank to use your overall density. Enter a percentage only where you want more or less hair. Fill in only the areas your hairpiece will cover.
Patrick will confirm which densities suit your chosen base.
3. Length, wave & curl
Choose the supplied length and texture. The finished haircut comes afterward.
See wave & curl examplesView examples
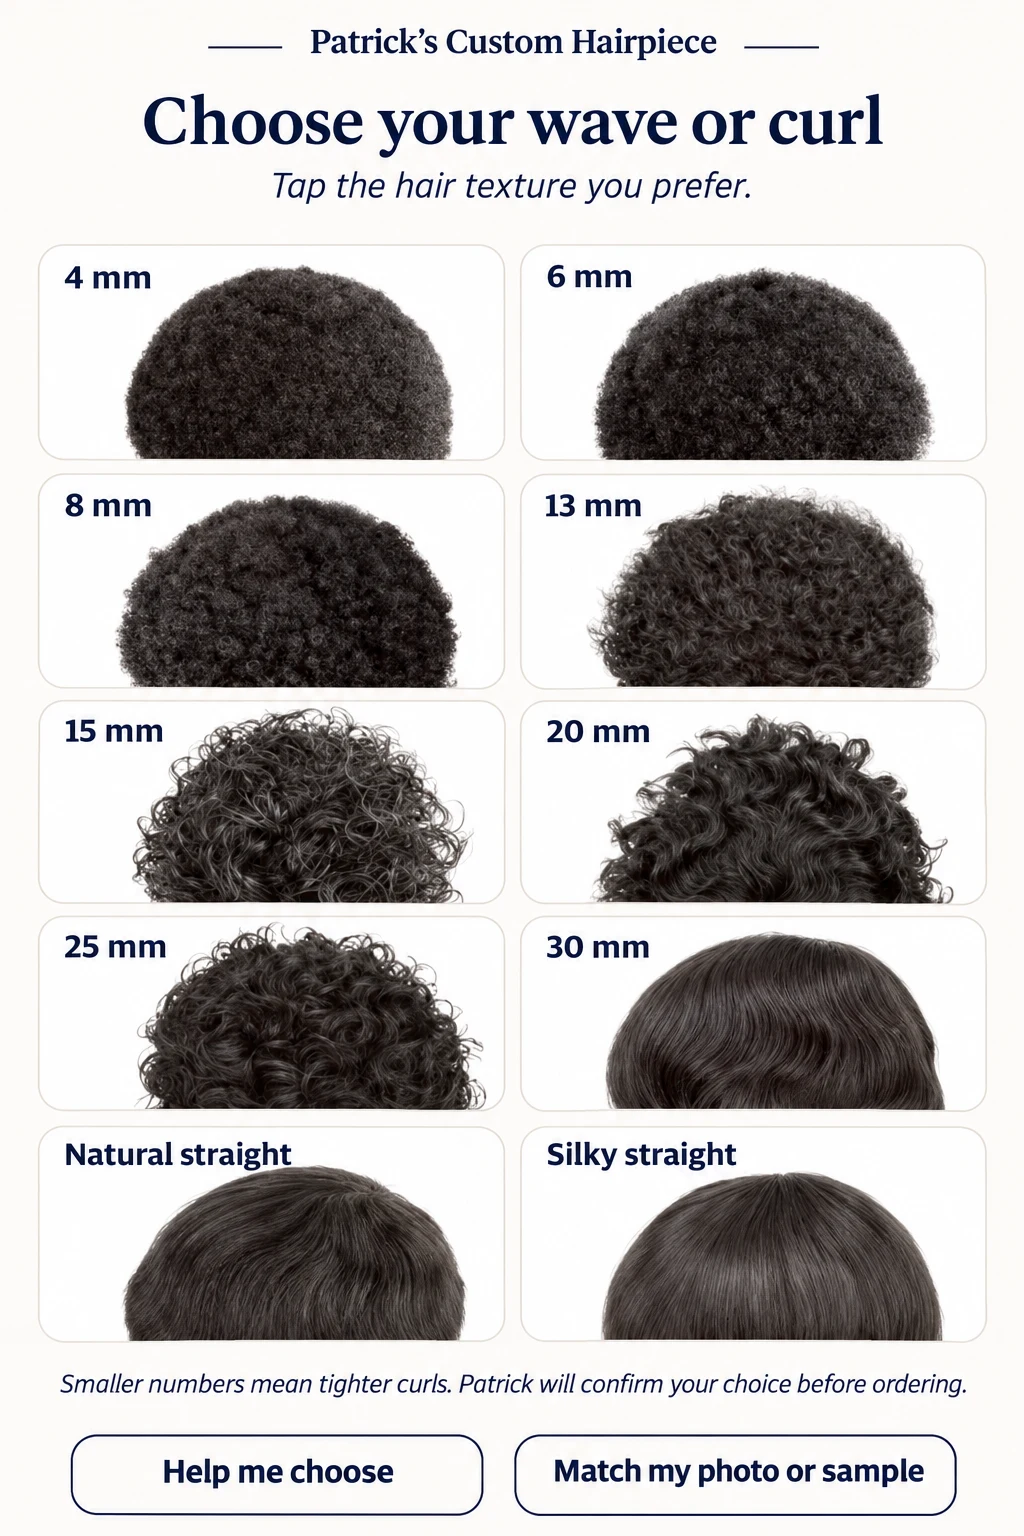
Compare the examples, then choose your wave or curl above. Patrick will confirm the finished pattern.
Hair length is measured before cutting. Curly hair appears shorter than straight hair of the same length.
4. How will you wear your hair?
Choose your style, crown position and how softly the hair starts at your forehead.
Hair direction
Where should the crown sit?
The crown is where hair changes direction near the back of the top. Choose its position separately from your part or hairstyle. Left and right mean your own left and right.
How should the hair start along your forehead?
5. Finish your look
Choose how you’d like your custom piece prepared.
Finishing service
Customize length, curl, color or gray by areaCustomize
Different hair in different areas?
Your overall choices apply everywhere. Open an area below only if you want to change its length, curl, color or gray percentage.
Front means the hairline. Crown means the back of the top. Temples are the front corners beside your forehead. Left and right mean your own left and right.
Front hairlineUses overall choices
TopUses overall choices
CrownUses overall choices
BackUses overall choices
Left sideUses overall choices
Right sideUses overall choices
Left templeUses overall choices
Right templeUses overall choices
Area-specific changes are requests. Patrick will confirm feasibility and any price difference before production. Regional density remains available above.
Baby hair, underhair & knot detailsCustomize
Use these only if you have a particular preference. Otherwise leave them for Patrick’s recommendation.
Review your choices.
Check each section. You can go back to change anything.
What to prepare for Patrick
What still needs confirmation?
Send your form, template or existing piece to us
New Hair for Men & Women · Attn: Patrick McKay
490 Post Street, Suite 1505
San Francisco, CA 94102
Call / text: (415) 788-0711 · info@newhairformen.com
Your contact information
Your mailing address
Ready to order?
Contact Patrick to confirm your selections and arrange payment.
Your choices are not sent automatically. Download your selections using the button below, then attach the downloaded file to an email to info@newhairformen.com. Include your name and contact details.
Or fill out the PDF form and email or mail it to us. We’ll review your fit, selections and final price with you, then arrange payment personally.
Call (415) 788-0711 · Text us · Open contact form
Online submission and payment are not available on this page.